Achieve Salon-Quality Nails at Home with Ease
Introduction: The Joy of At-Home Nail Perfection
In today’s fast-paced world, finding time for a salon visit isn’t always easy. Yet, who doesn’t love the fresh, flawless look of salon-done nails? Fortunately, achieving that professional finish at home is not only possible—it’s also surprisingly simple with the right tools, techniques, and a little practice. Creating stunning nails in the comfort of your own home can be a relaxing, creative experience and a satisfying form of self-care.
Whether you’re prepping for a special occasion or simply looking to elevate your everyday style, mastering the art of at-home nail care can be incredibly rewarding. Imagine pampering yourself on your schedule, skipping the salon queues, and still stepping out with picture-perfect nails that make you feel like a million bucks. Sounds like a dream? It’s not. Let’s explore how you can transform your nails into salon-quality masterpieces right at your kitchen table.
From proper nail prep to mastering polish techniques, learning how to create long-lasting, beautiful nails doesn’t require professional training. In fact, with a few essential tools and a little bit of guidance, you can become your own nail technician in no time. If you’re looking to enhance your nail game, Nagellak is one of the first things to consider—quality polish makes a big difference in the final result.
1. Create the Perfect Nail Prep Routine
Every great manicure starts with proper preparation. It’s like laying a foundation before painting a wall—smooth, clean surfaces always lead to a better finish. Start by removing any old polish thoroughly. Use a gentle, non-acetone remover to avoid drying out your nails and cuticles. Then, soak your hands in warm, soapy water for a few minutes to soften the skin.
Next, gently push back your cuticles using a wooden or silicone cuticle pusher. Avoid cutting your cuticles unless necessary; this skin protects against bacteria. Trim your nails evenly using clippers, then file them into your desired shape—oval, square, almond, or stiletto, depending on your personal style. Always file in one direction to prevent splitting.
After filing, buff the surface of your nails lightly. Buffing smooths out ridges and helps polish adhere better. Finally, cleanse your nails with an alcohol wipe or nail cleanser to remove any oils or dust. This simple yet thorough routine helps create a clean canvas, ensuring your polish goes on smoothly and lasts longer.
2. Choose the Right Nail Shape for You
Not all nail shapes are created equal, and finding the perfect shape for your fingers can really elevate your manicure. Some popular nail shapes include square, squoval, round, almond, oval, and coffin. Each has its charm and is suited for different finger types and lifestyles.
If you have short fingers, a longer oval or almond shape can elongate your hands beautifully. For those with naturally long nails, coffin or stiletto shapes offer a bold, fashion-forward vibe. Round and squoval shapes are great everyday options that balance style and practicality, especially if you’re typing or working with your hands often.
When shaping your nails, consider not only your aesthetic preference but also how active your hands are. A flattering shape that holds up to your daily routine is key. Once you’ve picked a shape that complements your hands and lifestyle, you’ll notice how much more polished your overall look becomes—even before applying polish!
3. Nail Health: Your Hidden Secret to Flawless Results
Healthy nails are the foundation of any gorgeous manicure. Brittle, peeling, or weak nails not only impact how your nails look but also how long your polish lasts. A consistent nail care routine that focuses on nourishment and strength will dramatically enhance your at-home nail experience.
Start by moisturizing your hands and cuticles daily. Cuticle oil is a must-have—it keeps the skin around your nails soft and prevents hangnails. Hand creams with natural oils and vitamins can also keep your nails hydrated. Incorporating biotin-rich foods or supplements may help strengthen nails over time, supporting natural growth.
Don’t forget the power of a good base coat—it not only preps the surface but also protects your nails from staining and breakage. Taking a break from polish every now and then to let your nails breathe can also work wonders. With a little TLC, your nails will be naturally strong, smooth, and ready to show off any polish you choose from https://nagelprodukten.com/.
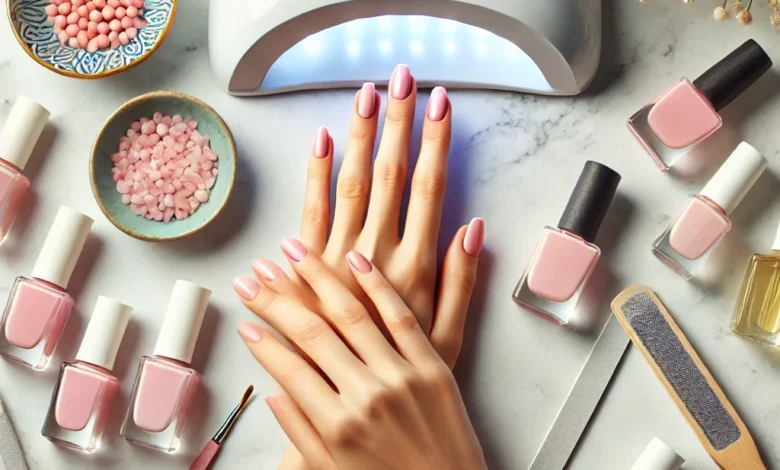
4. Master the Art of Applying Polish Like a Pro
Applying polish may seem easy, but doing it like a pro takes a little know-how. Begin by applying a thin base coat. This not only smooths the nail surface but also prevents discoloration and extends the life of your manicure.
When it comes to color, the key is applying thin, even coats. Load your brush with polish, then gently wipe one side against the bottle’s rim to avoid drips. Start in the center of your nail and swipe down, then fill in the sides. Avoid going too close to the cuticle—leaving a tiny gap helps create a cleaner look and prevents flooding.
Wait for each coat to dry slightly before applying the next. Usually, two coats of color are enough, but you can go for a third if you prefer a deeper finish. Seal everything with a top coat to lock in color and add a glossy, professional sheen. Don’t rush—allow ample drying time between coats for a smudge-free result that lasts.
5. Level Up with Nail Art and DIY Designs
Feeling creative? Nail art is a fun way to express your personality and take your manicure to the next level. From minimalistic dots and lines to full-on floral patterns or marble effects, the possibilities are endless—and you don’t need to be an artist to start.
Begin with simple designs like accent nails, polka dots, or stripes using a toothpick, dotting tool, or striping tape. Once you’re confident, explore more advanced techniques like ombré blending, foil transfer, or even DIY decals. You can also experiment with matte finishes, glitter top coats, and negative space designs to add visual interest.
Nail stamping kits and fine nail brushes can help you create intricate details, while stickers and gems are great for adding a little sparkle. Remember, nail art is all about having fun and trying new things. Each design is a chance to practice, learn, and show off your unique style. Keep your tools clean, store them properly, and soon enough, you’ll be creating Instagram-worthy looks right from your home!
6. Essential Tools for At-Home Nail Perfection
To achieve salon-quality results at home, investing in the right tools is just as important as using the right polish. You don’t need a massive collection—just a few essentials that will make a world of difference in your DIY manicure game.
Start with a high-quality nail clipper and file. Opt for a glass or crystal file for smoother edges and less breakage. A four-way buffer block will help you shape, smooth, and shine your nails with ease. Next, a reliable cuticle pusher and cuticle trimmer are key for prepping your nail beds without damage.
Other helpful tools include a silicone polish corrector pen (or just a small angled brush dipped in remover), nail art brushes for creative designs, and a UV/LED lamp if you’re using gel polish. Also, don’t forget a good-quality top coat and base coat—they really are the unsung heroes of long-lasting nails.
Keeping these tools clean is crucial. Wash them after each use, disinfect regularly, and store them in a dedicated kit or pouch. With these items in your arsenal, you’ll feel confident and equipped every time you sit down for a mani session.
7. Secrets to Long-Lasting Manicures
Ever notice how salon manicures seem to last forever, while your at-home attempts chip within days? Don’t worry—it’s not magic; it’s technique. With a few tricks up your sleeve, you can enjoy chip-free nails for up to two weeks or more.
First, don’t skip the prep. Oils and dust on your nails are enemies of lasting polish. Clean your nail beds thoroughly before applying anything. Always use a base coat—it acts like double-sided tape for your color, gripping both the nail and the polish.
Apply your polish in thin layers and let each one dry before the next. Thick coats might look okay at first but are more likely to smudge or peel. A good top coat is essential, especially one that promises durability and shine. Reapply a fresh layer of top coat every 2–3 days to maintain that glossy, just-done finish.
Lastly, avoid using your nails as tools. Opening cans, scratching off labels, or tapping on hard surfaces can lead to chips and breaks. Treat your nails like jewels, not tools, and your at-home mani will thank you.
8. The Power of a Proper Clean-Up
Even if you apply your polish like a pro, a little cleanup can make your nails look ultra-polished and professional. It’s the finishing touch that gives your manicure that crisp, salon-worthy edge.
Keep a small angled brush or an old eyeliner brush on hand, along with some polish remover. Dip the brush in remover and gently trace around the cuticle and sides of your nail to clean up any mistakes or smudges. This step only takes a minute but elevates your entire look.
If you’re working with darker or more vibrant colors, cleanup becomes even more important. It keeps your mani from looking messy or rushed. And remember—don’t stress about perfection while painting. You can always clean up the edges once your polish has dried a bit.
Pro tip: use a peel-off barrier or petroleum jelly around your nails before painting to make cleanup even easier. Once you’re done, simply peel or wipe off the excess for clean lines every time.
9. Maintain Your Manicure Like a Pro
You’ve done the work—now it’s time to make it last. Maintaining your manicure is a key part of keeping that fresh-from-the-salon look throughout the week. With just a few simple habits, you can stretch the life of your mani and keep your nails looking gorgeous.
Moisturize daily. Dry hands and nails can cause polish to crack or peel. Keep a cuticle oil pen in your bag and apply it on the go. Try to wear gloves while doing chores like washing dishes or gardening—water and harsh chemicals can wreak havoc on your nails.
Be mindful of how you use your hands. Try typing with your fingertips rather than your nails, and open packages with scissors instead of peeling with your nails. These little habits add up to big results.
Finally, if you notice chips or cracks, fix them right away. A quick touch-up with polish and a layer of top coat can help prevent further damage. With care and attention, your at-home manicure can rival even the priciest salon treatments.
10. When to Go Bare: Letting Your Nails Breathe
As fun as nail polish can be, giving your nails a break now and then is just as important. Letting them go bare for a few days—or even a week—can help restore their strength and health, especially if you’ve been using gel or acrylic products.
During your polish-free time, focus on nourishment. Apply strengthening treatments, cuticle oils, and hydrating hand creams regularly. Buff your nails lightly for a natural shine, and consider using a nail hardener if your nails are particularly soft or brittle.
You can also take this opportunity to trim and shape your nails, giving them a fresh start. Keep them short if they’re prone to breaking, and avoid picking at old polish or biting—these habits weaken the nail plate.
By cycling between polished and natural periods, you give your nails time to recover, grow, and stay resilient. When you return to your favorite colors and designs, you’ll be working with a healthier, stronger base that looks and feels even better.
11. Nail Care for Every Season
Your nails, like your skin, respond differently to changes in weather and seasons. Paying attention to how environmental factors affect your nail health is key to keeping them strong and stylish year-round.
In winter, cold air and indoor heating can dry out your nails and cuticles. Moisturizing becomes essential—use thicker hand creams and cuticle oils with ingredients like shea butter, jojoba oil, or vitamin E. Wearing gloves outside and after applying lotion helps lock in hydration and protects nails from harsh winds.
Spring and summer, on the other hand, bring more humidity, sun exposure, and outdoor activities. This is the time when nails tend to grow faster but are more prone to damage from pool chlorine or sunburn. Consider switching to breathable polishes or hydrating base coats to maintain moisture and flexibility.
Fall is a great time to transition your nail care routine. Exfoliate your hands gently to remove summer buildup, trim nails to avoid breaks, and experiment with deeper, richer shades that match the mood of the season. A little seasonal awareness goes a long way in keeping your nails looking fabulous and healthy no matter the month.
12. Quick Fixes for Common Nail Problems
Even with the best intentions, nail issues can pop up from time to time. But don’t worry—there are easy fixes for most common problems, and knowing how to handle them saves you both time and frustration.
Chipped polish? Lightly buff the chipped area, apply a thin layer of the same polish, and seal with a top coat. It won’t be perfect, but it’ll hold you over until your next full mani.
Peeling nails? This usually means your nails are dry or over-buffed. Give them a break from polish, apply strengthening treatments, and keep them moisturized.
Yellowing nails? This can happen from wearing dark polish too often without a base coat. Soak nails in a lemon juice and baking soda mix for a natural brightening boost, then follow with cuticle oil.
Hangnails or rough cuticles? Don’t rip them off—clip carefully and moisturize. Prevention is key, so keep cuticles hydrated and never skip oiling them.
With a little patience and a few simple solutions, you’ll bounce back from any nail setback in no time.
13. Building Your Signature Nail Routine
Like any self-care ritual, a great at-home manicure becomes even better when it’s part of a personalized routine. Establishing a consistent nail care schedule helps your nails stay in top shape and makes every polish application feel like a treat rather than a task.
Start by picking a day for your main manicure—Sunday evenings, for example, are perfect for winding down and prepping for the week ahead. Then, schedule small check-ins throughout the week to reapply top coat, moisturize cuticles, and assess any chips or breaks.
Rotate between bold colors, neutrals, and polish-free days to give your nails variety and a break when needed. Use this time as a mindfulness practice—light a candle, put on your favorite playlist, and turn your nail session into a mini spa moment.
Building a signature routine doesn’t just benefit your nails—it becomes a form of relaxation, a boost of confidence, and an expression of your unique style.
14. Celebrate Your Nail Journey
There’s something deeply satisfying about learning to do your own nails and seeing your progress over time. From your first wonky attempt to mastering clean cuticles and crisp lines, it’s all part of the journey.
Celebrate your improvements, no matter how small. Took your time and nailed the perfect shape? Awesome. Tried nail art for the first time and didn’t hate it? That’s a win. Every step forward is building your skill, confidence, and personal flair.
Snap photos of your favorite manis to track your progress and gain inspiration. Share with friends or keep a gallery just for yourself. Your nails are a canvas for creativity and self-expression, and every new technique or polish you try adds to your growing expertise.
The best part? There’s always something new to learn, and you never stop improving. That’s the beauty of at-home nail care—it grows with you.
15. Conclusion: Embrace the Freedom of At-Home Nail Artistry
Doing your own nails at home is more than just a beauty routine—it’s a fun, empowering experience that blends creativity, self-care, and personal style. With a little practice and the right tools, you can achieve salon-quality results from the comfort of your home.
From mastering the perfect polish application to nourishing your nails year-round, every step brings you closer to becoming your own nail artist. You don’t need to be a professional to enjoy the satisfaction of a well-done manicure—you just need a little time, patience, and a touch of flair.
So go ahead—embrace the freedom, explore your creativity, and pamper yourself. Your nails are waiting to shine, and now you’ve got all the tools to make them sparkle.